How to Stencil a Pumpkin | Hello Fall Pumpkin Project
Greet the coziest of seasons with this Hello Fall Pumpkin Project from Designer Stencils.
Here's what you'll need:

- Hello Fall Craft Stencil
- Americana Acrylic Paint
- Payne Grey
- Napa Red
- Pumpkin
- Primary Yellow
- Light Buttermilk (optional)
- Repositionable Spray Adhesive
- Double-Ended Stencil Brush
- Frog Tape
- White Imitation Pumpkin
- Small Craft Brush
- Paper Plates
- Paper Towels


Wait a few seconds for the spray to cure.


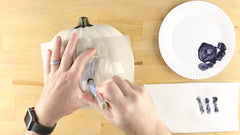
Thoroughly shake your bottle of Americana Acrylic Paint in Payne Grey prior to pouring out a small amount onto a paper plate.
After soaking the bristles, remove excess paint by swirling the brush on a stack of paper towels.
Carefully position and hold the stencil against the pumpkin separately for each letter.


Apply the color in light coats using the same swirling motion.
Make sure to press the brush straight down to help hold the stencil flat against the surface.
You might have to readjust the stencil position for some letters to account for the curvature of the pumpkin.


Next, switch to Napa Red to stencil the topmost leaf element.


You can use Frog Tape to mask any nearby elements that you do not wish to be painted red.


Stencil the leaf as you did the text earlier.


For the next leaf, use Pumpkin Spice paint.


Switch to Primary Yellow for the final leaf element.


If necessary, take a small craft brush and go over any elements that you would like to be more shaded.


