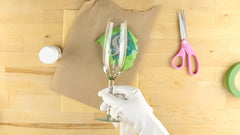
How to Stencil Glass | Etched Monogram Champagne Glasses
Just like newlywed love, these DIY etched monogram champagne glasses will last forever!
Before you begin: This project can be tricky so you might want to practice with a throw-away stencil and a couple of disposable (recyclable) glass jars.
What You Will Need

- Rainbow Bridge Letter Stencil Set (2")
- Etchall Glass Etching Creme
- Craft Stencil Brush
- Frog Tape
- Repositionable Spray Adhesive
- Scissors
- Safety Glasses
- Chemical-resistant Gloves
- 2 Champagne Glasses
Positioning the Stencil


Choose your glasses and your stencils. Oak Lane Studio has a wide variety of fonts to choose from but you'll want the 2 inch tall letters for a standard size glass.
First, cut out the chosen letter using a pair of scissors. Leave an equal amount of mylar material between your cuts and each letter. The more surface you have for the spray adhesive to stick to, the better. Also, you will want to save the other letters for future projects!
Affixing the Stencil


Next, turn over the stencil and place on a disposable surface, such as a large sheet of paper. Shake your can of Repositionable Spray Adhesive and spray one solid coat on the back side of the stencil. Let sit for about a minute.
Now, place your stencil on the glass and press evenly all around. It is imperative that every part of the stencil is firmly stuck to the surface of the glass.
Cut some slits around the edge of the stencil. This will help the flat stencil conform around the curved edge of the glass. Take care not to cut all the way from the edge to the letter itself!
Finish affixing the outer edge of the stencil to the glass using Frog Tape painter's tape.
Etchall Etching Creme


For the next part, be sure to wear protective gloves and eyewear. Etchall contains chemicals that could be harmful if precautions are not taken. Carefully follow all instructions on the bottle's label.
After removing the safety seal from the bottle, take a disposable craft brush and liberally apply the Etchall creme through the stencil and onto the surface of the glass. Once again, it is imperative that none of the creme gets underneath the stencil, or you will fail to get clean edges and hence not the desired shape of the design!
Set a timer for fifteen minutes. It is also a good idea to place the glass so that the etching creme is facing downwards and the top and bottom edges are supported. Do not rest the etching creme itself on the work surface!
Removing the Stencil and Etching Creme


After 15 minutes has expired, carefully remove the stencil.
I removed the gloves because I had difficulty lifting the edge of the tape but it's probably a good idea put them back on when you pull it off (in other words: don't be careless like me). Also, wear those safety glasses!
Next, rinse the Etchall creme off the glass under a faucet using a generous supply of water. If you use a kitchen sink for this, first remove all items that come in contact with food and wash the sink thoroughly after the project is completed.
Repeat the above steps for the other glass. First, rinse the stencil thoroughly and remove all tape. You might need to re-apply a thin coat of spray adhesive.


